When you include illustrations in some of your blog posts, it could be for a number of different reasons. Sometimes it could be a diagram, while at others it may be more to provide a certain aesthetic to the content.
In both those cases (and most others) it can be helpful to know how to add text to your illustrations. That way you can label any parts of your diagrams, or insert inscriptions, captions or titles. In short you could give your illustrations more context, or accentuate them in other ways.
Of course if you want to add text to photos on Mac you’ll need a photo editor. While most photo editors are able to insert text fields into images, few do it with the gusto that Movavi Photo Editor provides.
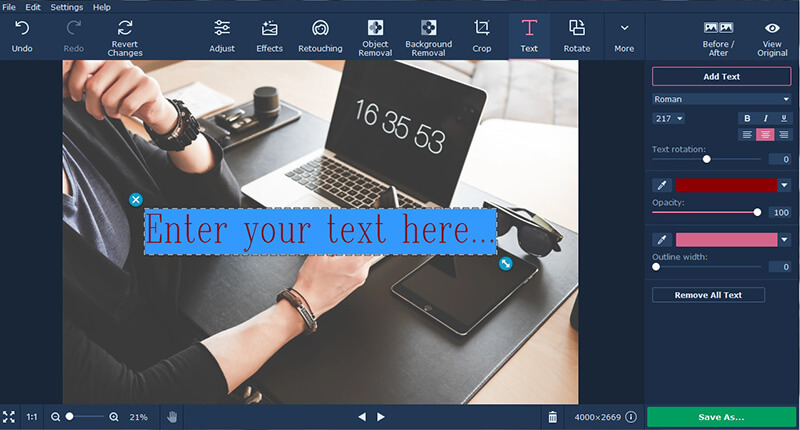
Within the clean and modern-looking interface of Movavi Photo Editor you should be able to quickly locate the ‘Text’ menu. As you could probably guess it contains all the tools you need to add text into your illustrations, and once you click on it you’ll see a variety of tools in the panel on the right.
Once again it will be fairly obvious what you need to do, and you can go ahead and click on the ‘Add Text’ button to start adding text to your photos. When you do click on the button a frame of dashed white lines will appear in the main window of Movavi Photo Editor, and you can type in the text that you want to add.
To control the appearance of that text you need only to look back to the panel and you’ll find a variety of different options that let you customize how it looks. Not only will Movavi Photo Editor let you select the font, size, and justification but it will also let you adjust the rotation, color, outline, opacity and much more.
Keep in mind that you can add as many text blocks as you want in this fashion, and adjust the style and appearance of each one individually. On top of that the other features in Movavi Photo Editor will give you even more control over how your illustration looks, and you could transform its frame, enhance the image quality, apply artistic filters, remove elements, and much more.
Now that you know how to place text into your illustrations, you should certainly take advantage of it when you next publish one on your blog. Whether you’re labeling diagrams, inserting motivational quotes, or even just creating memes – the tools in Movavi Photo Editor will ensure that you have full control over the text that you add and can make it look exactly the way that you want.


EmoticonEmoticon